Mediation
AdMob Mediation allows your application to serve ads from multiple ad sources through the existing AdMob integration.
AdMob manages these sources through mediation groups. Depending on the selected network and configuration, an ad source may participate through bidding, a waterfall, or both. Mediation can help improve ad availability and monetization, but the result depends on the configured networks, traffic, targeting, and available demand.
The plugin provides optional Android mediation adapters for the following networks:
- AppLovin
- Chartboost
- ironSource
- Meta Audience Network
- Unity Ads
When an adapter is enabled, the plugin automatically includes the required Android SDK and adapter during packaging. The network must still be configured separately in its own dashboard and in AdMob.
Note
Mediation adapters are currently supported only on Android.
Enabling these options does not add third-party mediation adapters to iOS builds.
The plugin's existing ad loading functions continue to use the same AdMob Ad Unit IDs when mediation is enabled. AdMob selects the ad source according to the mediation configuration.
The formats and integration methods available from each network depend on that network's current AdMob support and configuration.
Supported Networks
| Third-Party Network | Official Android Setup Guide |
|---|---|
| AppLovin | AppLovin mediation setup |
| Chartboost | Chartboost mediation setup |
| ironSource | ironSource mediation setup |
| Meta Audience Network | Meta Audience Network mediation setup |
| Unity Ads | Unity Ads mediation setup |
Follow the official guide for each network you enable. Required account details, placements, credentials, bidding support, waterfall support, and available ad formats differ between networks.
Enable Mediation Adapters
Open:
Project Settings → Plugins → PloxTools: Google AdMob → AdMob Mediation
Enable the networks you want to include in the Android build.
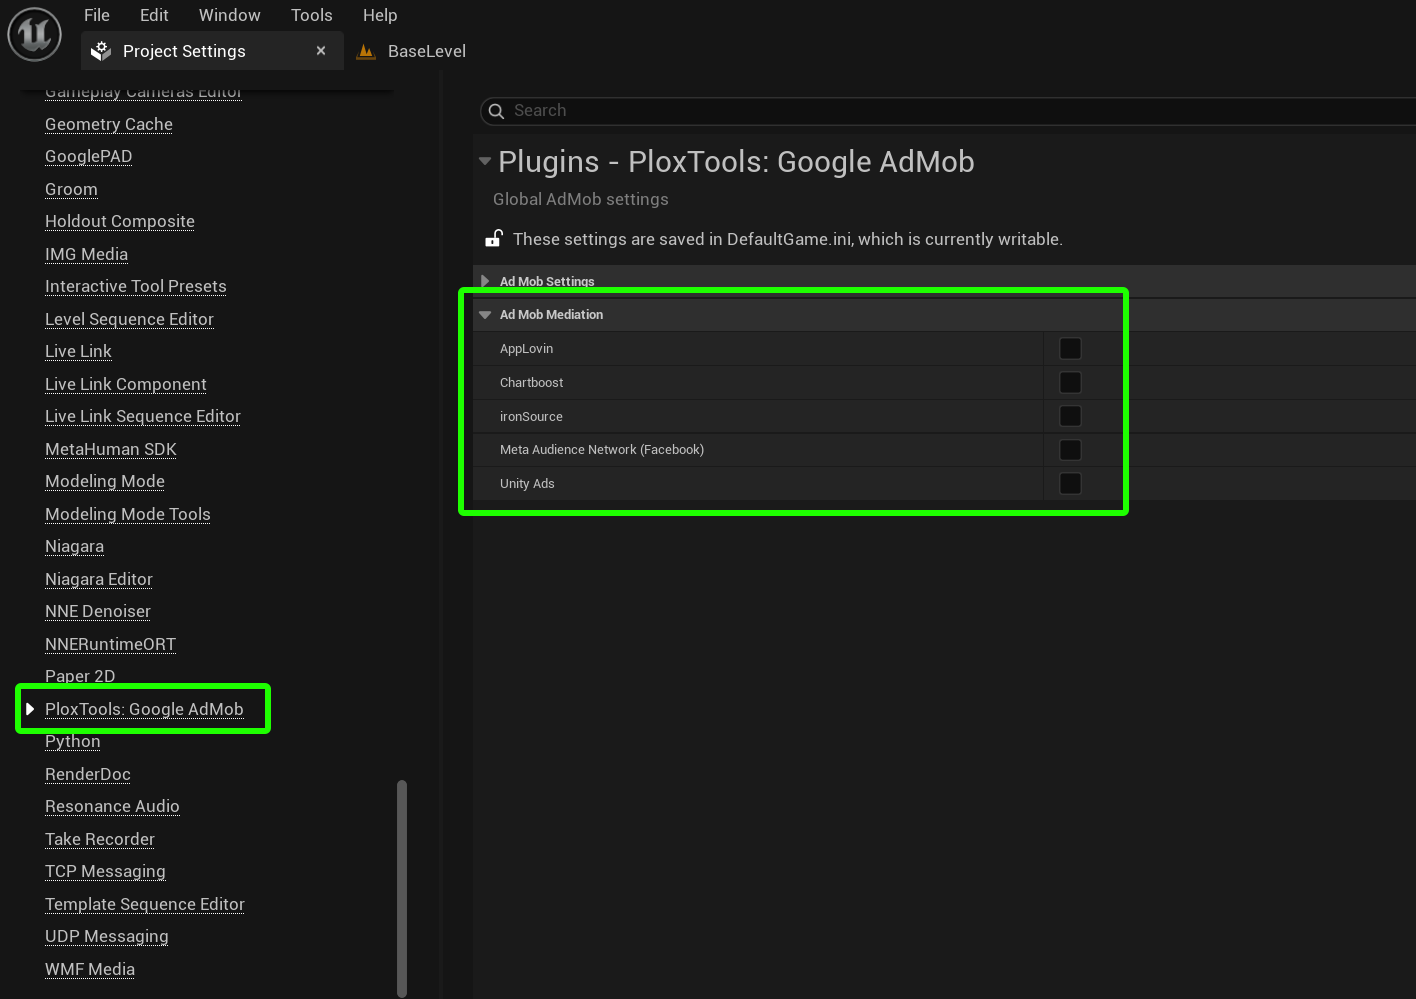
The plugin automatically adds the selected network SDKs and AdMob mediation adapters during Android packaging. No manual Gradle dependency changes are required.
Important
Enabling an adapter only adds the required Android libraries to the packaged application.
It does not create an account with the network, create placements, configure credentials, or add the network to an AdMob mediation group.
Configure Mediation Networks
Each enabled network must also be configured outside the plugin.
The exact steps differ between networks, but the general process is:
- Create an account with the selected ad network.
- Register the Android application in the network dashboard.
- Create the placements or ad units required by that network.
- Open AdMob and create or edit a mediation group.
- Add the required Android AdMob ad units to the mediation group.
- Add the third-party network as an ad source.
- Configure bidding or waterfall settings according to the network's official guide.
- Enter the required credentials and map the network placements to the AdMob ad units.
- Save and enable the mediation configuration.
Use the official setup guide in the table above for the exact fields and requirements of each network.
Android and iOS are separate applications in AdMob. The mediation adapters provided by the plugin must be configured for the Android application and its Android Ad Unit IDs.
Initialization and Ad Loading
Initialize AdMob and wait for initialization to complete before loading ads. This allows the Google Mobile Ads SDK to initialize the enabled mediation adapters before an ad request is made.
No additional Blueprint or C++ loading functions are required for mediated ads.
Continue using the normal plugin functions for Banner, Interstitial, Rewarded, Rewarded Interstitial, and App Open ads. Pass the AdMob Ad Unit ID configured in the corresponding mediation group.
AdMob handles the mediation request and returns an ad from an eligible source based on the current configuration and available demand.
Consent and Privacy
Third-party ad networks may have their own privacy requirements and consent parameters.
Google UMP manages the privacy flow configured in AdMob, but some mediated networks may require additional settings or may not automatically receive every privacy signal used by Google Mobile Ads.
Review the privacy section of each network's official setup guide and verify that your implementation meets the requirements of every enabled ad source.
See Consent & Privacy for the plugin's UMP and ATT integration.
Testing Mediation
Test each enabled network according to its official setup guide.
Some networks provide their own test mode, test devices, or test placements. Requirements differ between networks, so do not assume that Google's demo Ad Unit IDs alone verify the complete third-party mediation setup.
During testing:
- Confirm that the required adapters are included in the Android build.
- Initialize AdMob before loading ads.
- Use the test configuration required by the selected network.
- Verify that the network appears in the mediation response or application logs.
- Test every ad format that you intend to use with that network.
Do not interact with live production ads during development. See Testing for general AdMob testing guidance.