Basic Usage
This page shows the basic workflow required to load and display an ad with the plugin.
The same general workflow is used for most ad formats:
- Initialize AdMob.
- Load an ad using an Ad Unit ID.
- Wait until the ad is loaded.
- Show the ad.
Ad loading is asynchronous. Calling a load function starts an ad request, but the ad is not immediately ready to display. Always wait for the successful load callback before calling the corresponding show function.
Note
This page uses an Interstitial Ad as a simple example. Each ad format has additional options, callbacks, and behavior described on its own documentation page.
Initialize AdMob
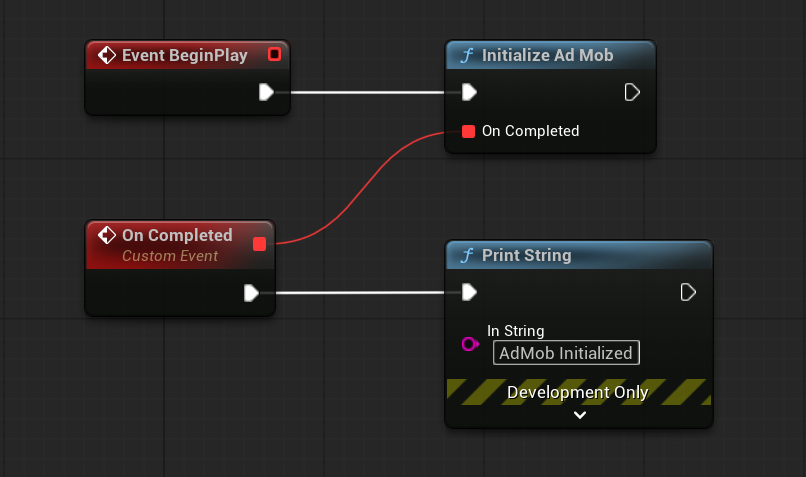
Call Initialize AdMob once when the application starts.
Explicit initialization prepares the Google Mobile Ads SDK and any enabled mediation adapters before the first ad request. It also provides a callback that confirms when the initialization process has completed.
The Google Mobile Ads SDK may initialize automatically when the first ad is loaded. However, calling Initialize AdMob explicitly provides a consistent workflow across Android and iOS and avoids performing initialization work during the first ad request.
You do not need to call Initialize AdMob before every ad load. Call it only once per application session.
A suitable place is startup logic that runs once, such as the Begin Play event of your main menu or another persistent object created when the application starts.
Load an Ad
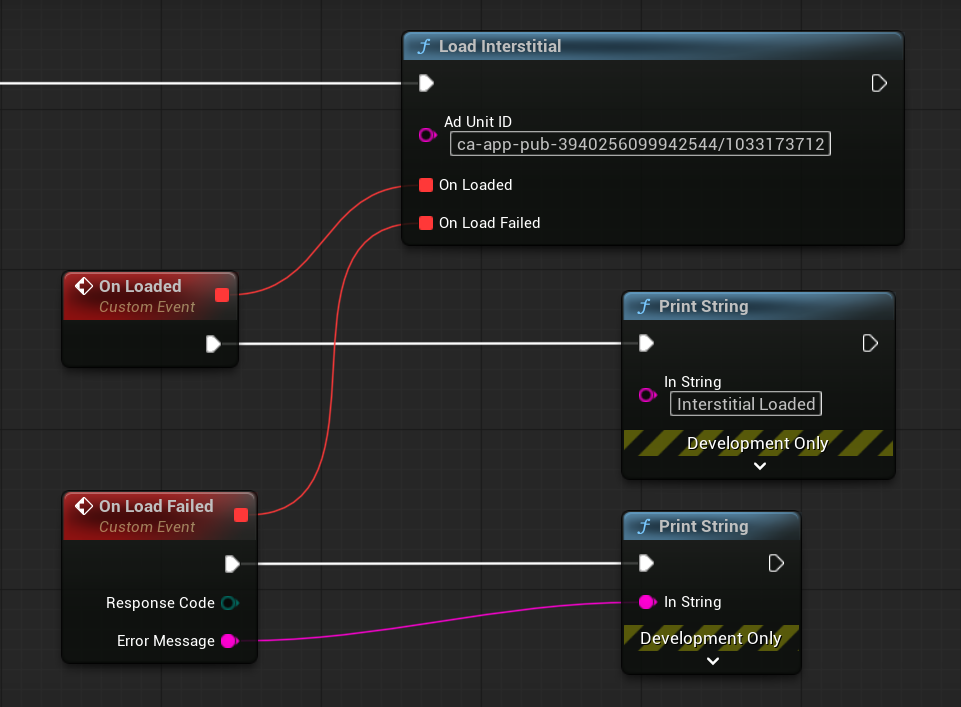
After AdMob has been initialized, call Load Interstitial and provide an Interstitial Ad Unit ID.
An Ad Unit ID identifies a specific ad placement in your AdMob account. Each ad format uses its own Ad Unit ID.
During development, use the official test Ad Unit IDs provided by Google instead of your production Ad Unit IDs. Android and iOS use different test Ad Unit IDs, so make sure you use the identifier that matches the target platform.
For this Interstitial example, use one of the following test Ad Unit IDs:
ca-app-pub-3940256099942544/1033173712
ca-app-pub-3940256099942544/4411468910
For test Ad Unit IDs for the other supported ad formats and additional testing information, see Testing.
Loading is performed asynchronously:
- On Loaded is called when the ad is ready to be shown.
- On Load Failed is called if the request cannot be completed.
Do not call Show Interstitial until On Loaded has been triggered.
Show the Ad
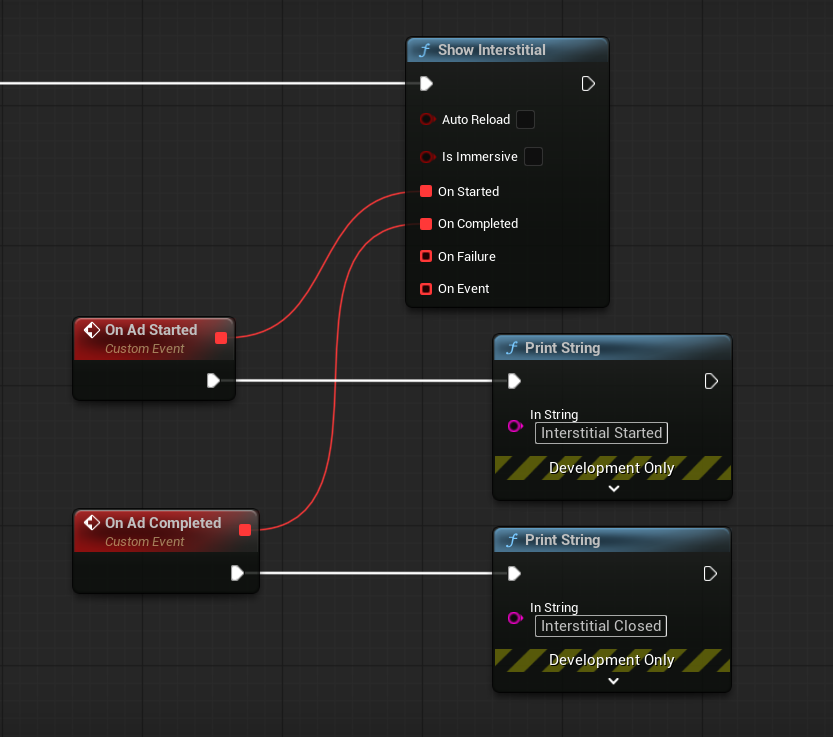
After the ad has loaded successfully, call Show Interstitial when you want to display it.
A loaded fullscreen ad can normally be shown only once. After the ad is closed, load another ad before the next display.
You can also enable Auto Reload when showing the ad. When enabled, the plugin automatically starts loading another ad after the current one has finished.
The show callbacks can be used to react to the ad lifecycle:
- On Started is called when the ad begins displaying.
- On Completed is called after the ad has been closed.
- On Failure is called if the loaded ad cannot be shown.
Complete Example
The complete basic flow looks like this:
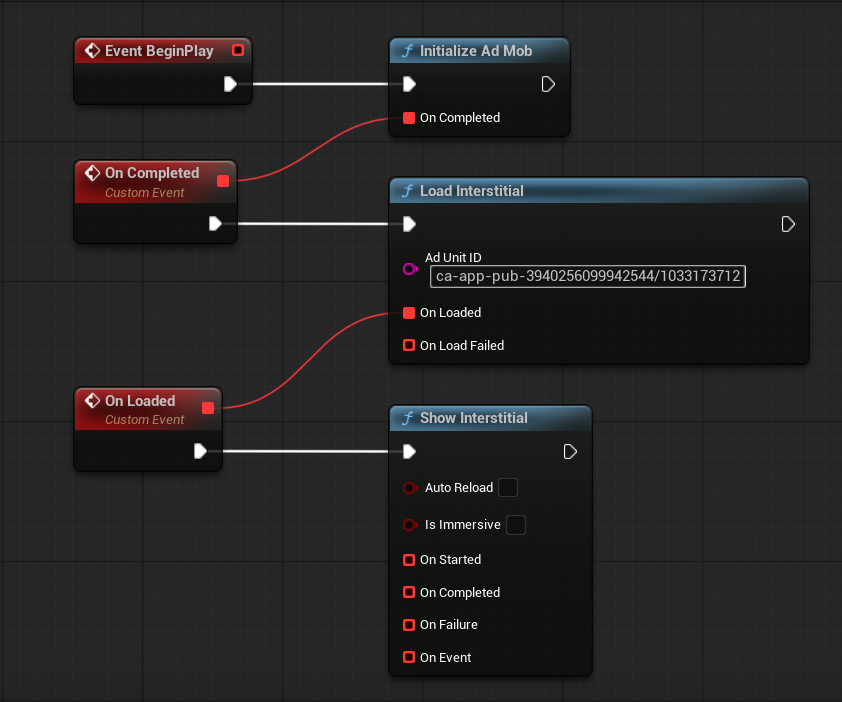
- Call Initialize AdMob once when the application starts.
- Call Load Interstitial after initialization has completed.
- Wait for On Loaded.
- Call Show Interstitial when you want to display the ad.
- Load another ad after the current ad has been shown, unless Auto Reload is enabled.
This example shows the shortest working flow. In a real project, the load and show operations are usually separated. For example, you can load an ad in advance and show it later after a level, menu action, or another appropriate gameplay event.
Next Steps
Before using ads in a production application, configure the consent flow described in Consent & Privacy.
This section explains how to request and manage user consent through Google User Messaging Platform before making advertising requests where required.
For safe development and testing, continue with Testing. It contains the official Android and iOS test Ad Unit IDs and explains how to test ads without using production identifiers.
For format-specific functions, settings, callbacks, and recommended usage, open the corresponding documentation page: